
StreamTV is an app-based, streaming TV platform that offers local programming and all the networks you love, plus movies and other premium content.
StreamTV includes features that allow you to restart, replay, pause, rewind and fast-forward many channels so you never miss a minute. Five hours of cloud DVR are included with every Stream TV package.
Being app-based, there’s no need for a set-top-box. Just download the free app to any approved streaming device and start watching!
StreamTV requires Wabash’s internet service.
Channel availability depends on the package you purchase. Check out the channel line up here: Wabash Channel Lineup
Currently approved devices for StreamTV are:
Mobile Devices
- Phones
– iPhone: iOS 10+
– Android Phone: Android OS 7+ - Tablets
– iPad: iOS 10+
– Android Tablet: Android OS 7+
Stationary Devices
- Streaming Devices
– Amazon Fire TV Stick: Gen 2+
– Amazon Fire TV: Gen 2+
– Android TV (nVidia Shield, MiBox): Android OS 8+
– Chromecast: Gen 2 - Smart TVs
– Toshiba/Insignia Fire TV: Fire OS 6+
– Sharp/Sony/HiSense Android TV: Android OS
As more devices become available, we’ll be sure to update this list.
Install the Fire Stick on your television.
- Start with your TV on.
- Follow the instructions that came with your Fire Stick.
* Be sure to note the port/input number where you insert the Fire Stick.
* You will need an Amazon account.
* Have your Wi-Fi username and password at hand.
Download the YourTV Green app.
- Using your Amazon device, go to the search function (magnifying glass icon) at the top left corner of the screen.
- Type (or say into the voice search) yourtv green
- When the app appears below, navigate down to highlight it and click the center button to select.
- Find and select the YourTV Green app:
- A new screen will appear. Near the bottom, select Download.
- Once downloaded, you can select Open from that screen, or click the Home button (house icon) on the remote and find the app to open. If it asks, select Next.
- Follow the instructions on the screen using the credentials given.
- Click next and enjoy!
*Please know while StreamTV is available on Apple TV, the app is not recommended just yet!
Install the Apple TV on your television.
- Start with your TV on.
- Follow the instructions that came with your Apple TV.
* Be sure to note the port/input number where you insert the Apple TV.
* You will need an Apple account.
* Have your Wi-Fi username and password at hand.
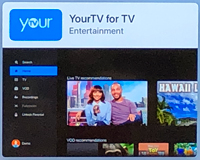
Download the YourTV for TV app.
* Apple TVs require a different app than other devices called “YourTV for TV.” The app functions the same at the RunMy.TV app, which isn’t yet available on Apple TV.
- Using your Apple TV device remote, go to the search function.
- Type yourtv for tv
- When the app appears below, navigate down to highlight it and click the top button to select.
- Select Get.
- When asked to ‘Get “YourTV for TV” for free?’ select Get and follow the prompts to complete the download.
- Once downloaded, click Open
- Follow the instructions on the screen using the credentials given. The server ID is geo.mn.yourtvnow.tv
- Click next and enjoy!
A device is the physical device the app is loaded on. A stream is what you use when using the app. Many customers load the app on to several devices but only use a few of those devices to stream simultaneously at a time.
Yes! You can watch StreamTV on multiple devices.
The device must be registered on your account. Every StreamTV package comes with 5 devices, but you can add more by calling us. To remove a device, please contact us.
The Local TV package comes with 1 stream, while Basic and Expanded packages come with 2 streams. You can add additional streams by calling us.
No. Most streaming devices, such as the Amazon Fire TV Stick, are relatively portable. However, they are also minimally priced. If you have a TV that gets used daily, you probably want to keep a streaming device on that TV. If you have a TV that doesn’t get daily usage, such as in a den or patio, you may be able to move the streaming device from TV to TV.
It’s your preference!
Don’t forget that StreamTV works on a number of other devices such as smartphones and tablets. And your StreamTV subscription comes with WatchTVEverywhere.
No. A standard free Amazon account will do.
Yes, you do need Wabash internet to watch StreamTV. Check out our internet offerings.
At this time, Wabash’s StreamTV is only viewable when your device is connected to Wabash internet service. However, WatchTVEverywhere is available for free when you are on the go. Learn more about WTVE.
Nope!
5 hours of Cloud DVR come with every StreamTV package. You can access your recordings from any device that is on your account. Be aware that recordings will remain on your DVR for 90 days, unless you protect the recording. You can purchase additional Cloud DVR storage in increments of 50 hours.
Many channels are available in HD at no extra cost.
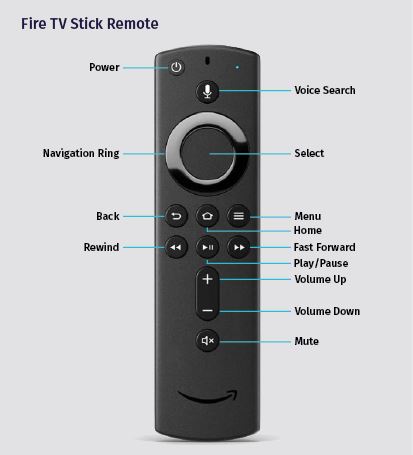
A simplified remote might take a bit to get used to, but you’ll be a pro in no time with use.
To use your smartphone as your Fire TV remote, follow these steps:
- Go to the app store on your smartphone. (Google Play Store for Android; Apple App Store for Apple.)
- In the search bar, type “Amazon Fire TV” and install the app.
- Open the app and sign in. Then tap New Devices.
- Connect to your Fire TV Stick when it shows up in the list.
You can now use your smartphone as a Fire TV remote!
Search for a Program by following these steps:
- Navigate to the top of the guide (or go to the menu) to the magnifying glass icon and click the Select button.
- Navigate over to the search field and either use the keys to type in your search or press and hold the Voice button on your remote to speak your search.
- Then, choose Next.
The results will populate.
It’s easy to get lost in the guide when you can lookback up to 72 hours and see future programming. To quickly find the current time in the channel guide, hold down the Back button to return to the current time in the guide.
To return to the current program that is playing, click the Back one or two times.
While watching a program, you can quickly access items like recently viewed channels, program details, pause/play/restart, record, and more.
Simply press the Select button for them to appear and Navigate to the option to use.
Program Info contains information about the current program and more. This includes easily finding more episodes of the program, details about the program, and similar shows. To access, follow these steps:
- Press the Select button.
- Navigate down and over to the Info icon.
- Press the Select button.
Recording a program can be done in the Live TV Guide.
A scheduled program recording will have a circled dot icon next to the name in the Live TV Guide.
Record a Future Program:
- Find the program you would like to record in the guide. (Past programs cannot be recorded.)
- Press the Select button once to see the program detail and again for record options.
- Navigate to the Record options and Select. The recording menu will appear. Here, you can record the current episode or the series, if available.
– To record the current episode, select Record Episode. That’s it!
– To record the program series, select Record Series. The series will record, but you can also change these three options: channel to record, record new or all episodes, and choose how many episodes to keep.
Record a Current Program:
While watching the program, the recording will start from where you are in the program. To start recording from the beginning, you must Restart. (See Restart instructions).
- To record press the Select button and Navigate to the record icon (circled dot) and click Select. Stop the recording by doing those steps again.
Manage Your Recordings:
To watch or change your recordings, follow these steps:
- Go to the Menu and Select Recordings.
- Navigate to the program (or series) to view and Select.
Recorded programs will stay in the Recordings menu for 120 days unless you protect the recorded program. Protecting the recorded program will ensure the program is saved to your cloud DVR. A program can only be protected after it has been recorded.
Here’s how to protect a recorded program:
- In the Recordings menu, go to the recorded program and select it.
- Instead of playing the program Navigate over to the right to view the program information.
- When the program information appears, Navigate over to the Protect Recording option (blue means you are on that option) and Select. The recorded program is now protected.
To unprotect a recorded program, repeat the above steps.
Restart the current program by following these steps:
- Press the Select button.
- Navigate down and over to the Restart icon and press the Select button.
To get back to the current time, do these steps again.
Pause/Play the current program by pressing the pause/play button.
Or, press the Select button, then Navigate down to the Pause/Play icon and press the Select button.
Fast Forward/Rewind the current program by pressing the fast-forward or rewind buttons on your remote.
Or, press the Select button, then Navigate down to the Progress Bar. Using the Navigation button, press (or press and hold) the right side to rewind or the left side to fast-forward.
*Some channels do not allow you to fast forward while the show is in the process of playing live, even if you restart or record the show.
Lookback allows you to watch past programs up to 72 hours ago. Not all channels have this offering.
To view, follow these steps:
- In the Live TV Guide, Navigate back in time to find a program. (Gray indicates a program available for replay.)
- Press the Select button to view details and again to start the program.
Recently viewed channels will populate as you view different channels. To view these channels while watching a program, follow these steps:
- Press the Select button one time. Boxes will appear at the top of the screen.
- Navigate up to choose one of the recently viewed channels.
- Press the Select button to go to that channel.
WatchTVEverywhere allows you to watch your favorite television shows and programs at no extra charge on any internet-connected device: smartphone, laptop, tablet and more.
To register, you’ll need your Wabash account number (which can be found on your billing statement), the last name on your bill, and your email address.
You can also view a full and growing lineup of available channels via the link. (Some channels may require you to download their app and/or log in again.)
StreamTV is built as adaptive bit rate, meaning the app uses the bandwidth available and the device/screen you are using to determine the viewing quality.
If your show seems blurry or is buffering, you may not have ample bandwidth or your WiFi signal is weak. Because StreamTV uses the internet, you need WiFi coverage where you are using the device.
We recommend running an internet speed test. Here’s how. If you need more speed, let us know. You can try a higher speed 30 days for free.
If you find you need better WiFi coverage, Wabash can help. Give us a call.
Know that we are here to help 24/7 by phone.